



Lippert Components 806621 Thin Shade Complete Window Kit for RV Entry Doors, Black
Product ID: 168844803
🌞Tinted glass for sun control
🔧Complete hardware kit
🖤Sleek black frame
Desertcart purchases this item on your behalf and handles shipping, customs, and support to Congo.
🖤 Shade in style, privacy on your terms.
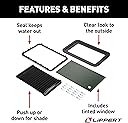
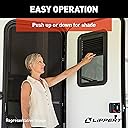
The Lippert Components 806621 Thin Shade Complete Window Kit is a sleek, easy-to-install solution designed for 5th wheel and travel trailer RV entry doors. Featuring a slim black frame, tinted glass for enhanced privacy and sun control, and a manual lift shade embedded within the frame, it offers effortless operation without bulky hardware. The kit includes all necessary installation components and weather-resistant seals, making it a durable, stylish upgrade that enhances both the look and functionality of your RV entry window.
| ASIN | B07XPFTS9R |
| Best Sellers Rank | #49,699 in Automotive ( See Top 100 in Automotive ) #31 in RV Windows & Skylights |
| Brand | Lippert Components |
| Customer Reviews | 4.4 4.4 out of 5 stars (1,783) |
| Date First Available | September 19, 2019 |
| Item Weight | 9.45 pounds |
| Item model number | 806621 |
| Lift Type | Manual |
| Manufacturer | Lippert |
| Manufacturer Part Number | 806621 |
| Model | Thin Shade RV Entry Door Window Shade Complete Kit for 5th Wheel, Travel Trailer and Motorhome |
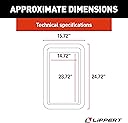
| Product Dimensions | 24.7 x 15.7 x 5 inches |
| Special Features | Easy to Assembly |
M**A
Should be a factory install
This shade and tinted window kit should have been installed from the factory. Having the tinted window glass is worth the price alone, why the factory puts in opaque glass in the door makes no sense to me. The window now matches all the rest of my windows plus I can see out of it. And no more morning sun screaming in because I can close the shade! As you can see by the picture, I installed it upside down like many others so I can block the view from the outside while still able to see out from the inside. The hardest part of this install is getting the old window out. The included plastic keys worked fairly well except for 2 which just would not release the tabs inside the window no matter how I worked them. I ended up breaking those 2 inside clips but I can't imagine any scenario where I would reinstall the original glass so it really doesn't matter. Prior to install, I decided to remove the screen door which is only 6 screws. This allowed me to latch the door closed and work from the inside while my wife held the outside half containing the glass and outside trim. It would have been much harder with the screen door in the way. As far as the trim is concerned, it matched up perfectly with the original trim. The advantage of using Lippert parts on a Lippert door. The other shade sold by a similar name uses 16 screws to fasten on the inside where the Lippert kit snaps together like the original making it a very clean install. As others have stated, the weak link is the shade itself. Does it function as advertised? Yes. But it does appear rather fragile and I will have to use it accordingly. Already I have found that 2 hands running it up or down is much more preferable to simply grabbing it in the center and risk binding it. Packaging was adequate, even though the box arrived somewhat squished like the Amazon driver loaded other packages on top of it, neither the glass inside or any trim was damaged or scuffed and all 16 keys were included (unlike the other similar sounding named shade). The only complaint I have is the instructions are worthless, only covering the installing of the shade itself into the frame. No instruction whatsoever on removing the original glass or reinstalling the new glass. You Tube is your friend, lots of great videos there show exactly what to do. Would I buy this again? Absolutely! Having a dark tinted door window with a shade is a no-brainer. It should have been a factory install to begin with. UPDATE: After a year of using this shade, I stand by my complaint that the shade itself is the weak link here. Being thin, lightweight, and fragile I have found that in hot AZ heat the plastic support that fits into the top of the frame and contains the strings and thus all the weight of the pleated fabric shade will warp and fall out of the frame leaving the shade a droopy crushed mess. I have had to completely remove the shade and reform the plastic support with a heat gun to make it fit back into the frame again. Because it isn't perfect, I had to install the shade upside down and place the what-used-to-be bottom support into the top of the frame in order for it to be usable. Longevity is questionable...
C**E
Arrived damaged, but still installed just fine. Quality is great.
The product arrived in a damaged box, and the glass adhesive gasket had shifted slightly, which made installation a bit tricky—the glass tended to move around during setup. One of the clips was pre-connected and unfortunately broke when we tried to separate it. Based on the clip design, this is clearly intended as a one-time install. Once we aligned the frame in the window opening, it was fairly easy to secure. It took two of us: one held the frame steady while the other tapped it into place with a palm. After installation, the difference was immediately noticeable. The overall build quality is far superior to the original window frame, and the official Lippert shade operates much more smoothly than the generic alternatives we’ve tried in the past. Despite the initial challenges, the product performs exactly as expected and feels like a worthwhile upgrade.
D**S
Looks OEM, Easy Install for Keystone Springdale 202QBWE
Installed on my Keystone Springdale 202QBWE. It already came with a frosted glass window, but with no shade nor means to add one without picking one of the "velcro" options, I chose to replace the entire unit. Replacing the door mounted window was easy. Good thing it was intuitive, since the instructions that came with the unit suck badly. Therefore, I am adding my own here to aid future purchasers: TOOLS NEEDED: Nylon trim pry tool Alcohol wipes INSTRUCTIONS: -Use plastic keys to separate new unit into two parts. THOSE KEYS ARE IMPORTANT. Set new unit aside. -From interior side of door, look for small "notches" at the base of the window trim. Use your new unit as a template if needed - slowly insert each "key" into each notch until you feel a "click" (photo) -Once all "keys" are inserted, use your trim tool at the top of the frame to begin prying the trim away from the door. Hold the trim away as you pry to avoid it locking back together again. -The interior trim should now pop off. Use your trim tool to CAREFULLY remove the glass pane from the inside, setting it aside. -From the outside, use your pry tool to break the butyl tape seal and remove the exterior trim. -Use your alcohol wipes to scrub off any residual butyl tape from your door exterior surface. -Mount new exterior trim - it's the one with the butyl tape strips. -Mount your new glass pane from the inside of the door. Apply gentle pressure from both sides of the glass to ensure it sticks to the butyl tape. -Load your window blind into your interior trim piece. There are locking tabs at the top and bottom of the trim piece - set your blind inside and twist the tabs to engage. -Mount your interior trim piece to the door, taking care to engage the locking tabs. I started from the top and worked my way downward. You'll hear a "click" as each tab engages. -Once all tabs are engaged, apply pressure to both sides of the door on the trim strips. This will lock it down and ensure the butyl tape engages with your exterior door surface. You're done! Four stars. I docked one for poor instructions, and for the flimsiness of the shade. Overall though, I am pleased with the look and recommend this window unit.
G**L
A Must addition
Easy install. Works great. But you won't use it much, unless, your purchase an EasyPeasy Window Screen with zipper. Without the EasyPeasy you have to go outside to open or close the shade. With the EasyPeasy you unzip the screen from inside the RV then open or close the shade, zip up the screen. Now you will use the shade all the time.
E**U
Finally Installed a Lippert Thin Shade
I have been looking at this window replacement for over a year now, and finally went through with it. The factory frosted door glass that came in our 2022 Coleman 1805RB was a pain in the early mornings. The texture of the frosted glass amplifies sunlight and basically glows like an LED light panel. Not ideal when trying to sleep past sunrise. We made a foam board panel that worked in blocking out the sunlight, but it looked kind of tacky. The Lippert Thin Shade installed in about 40 minutes all by myself. I had zero issues with materials or fitment. The tinted glass does a great job cutting down the light while allowing you to see outside. You can't see through the factory frosted glass at all. With the Thin Shade drawn into position, it blocks even more light from entering. You can install the inner frame for a top-down shade function or for a bottom-up function, which is what I went with. This way, from the outside looking in, you have to look up and will only see the ceiling basically when the shade is drawn atleast halfway closed. From the inside looking outward, I can see the ground and anyone that is within range of the steps and the door. I have no doubt that this kit will last for a long time to come. It feels as durable as what came in our trailer. $100 plus feels pretty fair for what you get.
R**T
You're going to be glad to have this!
Most RV trailers have the frosted glass in the door, which does keep the direct sunlight out but doesn't really mitigate the brightness when the sun is hitting the glass. The frosted glass makes it impossible to see who is knocking at your door, so if you don't have another window positioned where you can see the person knocking, you're taking a chance. The old window and frame comes out. Use care so you don't bend the thin aluminum panel on the interior face. You're going to break all the plastic tabs on the old window frame, don't worry about those. We found the window from the factory was not sealed properly the full perimeter, allowing water and dust to come on in. There isn't any way to actually seal the original window without breaking the tabs, so if you find yours is leaking, this is a good fix as you can position the sealant before you set the frame in the door. Once we had the exterior frame set in the opening and inserted the new dark tinted glass, the hardest part is to get the inner frame to fully engage the plastic clips to sandwich the frame securely in the door. If the door is taken off and laid on a horizontal surface a single person can do this chore, with the door still on the trailer I needed my wife to press against the outside frame while I pushed and bounced each portion of the inner frame until no more clicks of the plastic tabs were heard. Once you have these set, the window doesn't move around at all. The window shade can be mounted to close off by pulling the shade up or you can turn it 180° and close the shade by pulling it down. The four locking levers are easy to operate, can be a bit of an exercise to make sure the pleated shade fits back within. When the outside door is closed, our screen door is in the way and we can't adjust the shade once the door is closed. You have to find the position for the shade you like by standing on the step to adjust it. We have ours positioned to pull the shade down to open, leaving about 6" at the top of the window so we can look out to the visitor. The dark tint reduces the amount of glare inside the trailer, and you can't see in from outside the trailer during the day. We are very pleased with this purchase, and we think the RV door manufacturers need to rethink some things.
T**D
It fit perfectly into the original LCI window opening - UPDATED
My original Lippert window had frosted glass, The Lippert 806621 Thin Shade Window kit comes with tinted glass. My plan was to use my original frosted glass with the new Thin Shade window frame but unfortunately Lippert changed the glass size in both width and height. Oh well. My Thin Shade Window Kit came with the an instruction sheet for a different Lippert product. After looking around on the Lippert website I was able to locate and download the correct instructions. After downloading the correct instructions, installation was fairly straightforward. I used blue masking tape to hold the outer section of the frame in place while I removed the inner section of frame and the glass. Then I removed the outer frame. Although not mentioned in the instructions, on the outer surface of the door I used adhesive dissolver to remove all of the old gasket material, then cleaned off the remaining dissolver, and finally wiped the gasket area with isopropyl alcohol to prepare it for the new gasket materal. I installed the outer frame and taped it to the outer door surface with blue tape. To be on the safe side I also wedged a swimming pool noodle between the outer door surface and the side of the RV with the door latched open. This created additional support holding the outer frame in place. I placed the glass into position and snapped the inner frame into the outer frame. Once snug, I used a rubber mallet as instructed to finish tightening the frame halves together. Tip 1: I suggest that you install the pleated shade into the inner frame PRIOR to beginning the installation. My lower levers were extremely hard to rotate and I was unable to turn them with the frame installed. Tip 2: The frames halves are not marked for orientation. Be sure to orientate your frame correctly. The top of the frame has a larger crossbar to cover and protect the pleated shade when it is in the up (open) position. One other comment is that the shade does not totally block out or cover the entire glass, There are still gaps on the sides when looking at the window at a 45 degree side-ward angle. I gave my 3-star rating due to: the missing instructions, balky lower levers, lack of orientation markings, and incomplete window coverage. ******************************************************** 1/6/2020 - It is now 3 weeks later and I am dropping my 3-star rating to 1-star. After only a few uses, when you open the shade the pleats no longer lay flat against each other. Instead, they have started to bunch up into a wad. We are very disappointed and recommend that you look elsewhere for a shade. Lippert missed the mark on this one.
D**H
worked
We have been fighting with cold air coming in from the top of the door. In my latest attempt to seal it, I realized the air was coming from under my hand. We've had the window covered for years because the light comes into our bedroom. I removed the covering and saw that the glass had somehow fallen two inches. That's where my cold air has been coming from. We ordered this window, did a simple install, and are very happy with the result. I'm not sure about the protection afforded by a snap in window, but rv's aren't real hard to break into anyway and an attempt would give me plenty of time to reach for my...personal protection. Also, we live in a rural, conservative area where neighbors still look out for one another. But, we seem to have had a lippert window as this fit perfectly. The install is much easier with two people , but I imagine it would be easy enough for one person and some tape to hold the outer half in place. Winter is coming here and we will see how it holds up and seals, but I'm optimistic. My box was in good condition and it is packaged in another box inside that. I would recommend.
B**B
Easy install
I love this new addition to my rv door. It let's in extra light and it was a breeze to install. Down fall they don't provide a template for a new install, I had to do all the measurements from the frame. It would be nice if they included a template to make things go a lot smoother, but all in all it's a must have.
M**N
Top
Gut und preiswert. Schnelle Lieferung, einfacher Einbau
M**L
Ventana de caravana
Me gusta como se ve, lo único que tiene movimiento cuando cambia el tiempo de calor a frío, hay un ligero movimiento porque es plástico y me arruga el tapiz de la puerta, de ahí en fuera todo bien
D**D
Very good RV door window
I bought this window to replace the privacy glass one on my RV. It went in easily once I figured out the shade only goes in one way. We both love the look and the ability to block lights in camp grounds
J**G
Careful while installing.
This unit use's "click together" fastener to "sandwich" the glass and the door frame. If not careful you can break the click tabs. The end result is very nice. Great fresh new look to RV and nice to see who's at your door. WAKING ME UP TOO EARLY. Just kidding.
Trustpilot
5 days ago
1 month ago