We remain fully operational. Our teams are working around the clock to ensure your deliveries continue safely.

DOWNLOAD THE APP


Customer Services
Copyright © 2025 Desertcart Holdings Limited
DOWNLOAD THE APP

⚡ Elevate your Raspberry Pi Pico game with pro-level breakout power!
This Treedix breakout board is a precision-crafted, gold-plated flexible PCB shield designed exclusively for Raspberry Pi Pico. Measuring a compact 43.2x57.8mm with dual-sided plating and terminal blocks, it offers enhanced connectivity and customization for developers. The kit requires self-soldering, empowering users to build a tailored, high-quality interface for advanced project development.


| ASIN | B091F7YSCD |
| Best Sellers Rank | #399 in Single Board Computers (Computers & Accessories) |
| Brand | Treedix |
| CPU Model | Raspberry Pi Zero 2 W |
| Compatible Devices | Raspberry Pi Pico |
| Connectivity Technology | some wired connectivity technology |
| Customer Reviews | 4.4 4.4 out of 5 stars (287) |
| Manufacturer | Treedix |
| Mfr Part Number | TRX5-0139 |
| Model Name | Raspberry Pi Pico |
| Model Number | TRX5-0139 |
| Operating System | Linux |
| Processor Count | 1 |
| RAM Memory Technology | LPDDR4 |
| UPC | 764784795988 |
| Wireless Compability | Bluetooth |
A**Y
You will need a fine tip soldering iron and the thinnest solder you can find
Since I was planning on doing some Pico projects I thought the terminal block would be a good idea. I was pleasantly surprised with the quality of the parts even though they looked very small compared to what I was used to back in my working days. Luckily I have a fine tip soldering iron and a bunch of really good very fine solderwire. I hadn't soldered up headers in quite a while so I was pleased with myself as well. It makes a very nice tidy piece of kit. You will need a 2mm straight blade screwdriver for the terminal block screws as well. Since I mostly work with Raspberry Pis, I will have to get some M2 hardware for standoffs but that's not a problem as long as I use it on a non-conducting surface.
W**H
Third time purchase.
The kit comes unassembled. The ad said 'welded' which I assume got lost in translation from Chinese to English. So you will need to solder the components together. My concern is the terminal blocks are VERY small and require a tiny flat head screwdriver. I tried to back out a terminal screw to connect a 16 AWG wire and the screw internally seperated from the terminal. So now Pin 5 won't tighten or loosen making the pin useless. Beware of this when connecting wires.
J**N
Works great high quality
Works great for adding easy hook ups to pico.
S**Y
Very good, but one flaw and a warning
Edit: After actually assembling the product I discovered something that could have been a huge problem. No matter how hard I turned the screws in the terminal, the jaws would not close. There was plenty of room to insert a wire, but no motion upon turning the screw. It turns out that these terminals arrive in a fully closed position, unlike the dozens or hundreds I have used before. You have to turn counterclockwise until the original opening starts to close and new one appears. Then you can proceed as normal, inserting a wire in the new opening and tightening the jaws. == original text == I have not assembled this yet, but there are already some observations, partly in response to other reviews. 1) In general this is well made. It is nice that the headers are made to exact length so there is no cutting to do. 2) Yes, you have to solder the headers, but it's easy. 3) No, you do NOT have to bridge solder between the green screw terminals and black headers. These are the lines in red on the schematic. It is already done internally, as noted by another user. My ohmmeter agrees. 4) The screw terminals are tiny. I'll have to switch to a smaller screwdriver blade when switching between these and the ones on my other gadgets. A pain, but not a deal breaker (but see the edit above). 5) I don't know yet whether the terminals are fragile, but thanks for the warning. I'll try to unscrew them no farther than necessary. 6) The line of holes between the Pico header and the screw terminals is blocked by the terminals. This is definitely a design flaw, because you can't through-solder in the normal way. I suppose that things like resistors or simple wires will be okay, inserted from the bottom just 1 mm into the hole. Back to the screw terminals. The most common screw terminals seem to be on 3.5 mm centers, while the Pico pins are on 2.54 mm centers. This forces everything to be smaller. It probably would have made the board larger or more expensive to use beefier screw terminals. For example, fanning the terminal holes out to 3.5 mm spacing would have added 18 mm to the board length. In general I'm happy to have this. It will make it easy to work with the Pico until I have figured out what I need for my project. For the final design I'll probably end up with a custom circuit board.
B**5
This is a KIT!
This product does not come presoldered, you must solder it yourself! The description even says so, though I and many others failed to notice! Why in the world would I want to purchase an unassembled breakout board when for the exact same price one can be had that is fully assembled? ARGH!!!!
E**T
Very useful for your Pico.
I like these a bit more than some of the other breakout boards. It just seems to be a bit higher quality. It also makes for easy reuse for different projects without the need for breadboards.
C**C
Quick to solder up.
This is the second one I bought. It’s quick to solder up, and it works well with all GPIO ports. The terminals require small wires, and breadboard parch wires work very well (I have mine connected to a relay bank). The screw holes are smaller than regular standoffs, btw. TIP: if you have a fried Pico (or you are a quick solder), it helps to mount the Pico to the headers before soldering to achieve good alignment.
E**L
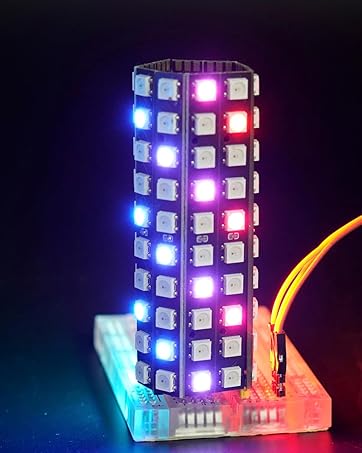
Very helpful for driving WS2812 LED strips from PI PICO W
I had an existing WS2812 based LED light system that I decided to rebuild using the Raspberry PI Pico W microcontroller. So, I got one, and also got the Treedix breakout board to go along with it. It all went together easily. As part of my setup for the PI Pico W, I realized I would also need to step-up the output voltage from 3.3v to 5v to adequately drive the LED strip. This would have been a pain ordinarily, but this breakout board made it a snap. I used a SN75AHCT125N chip (also on Amazon) to convert the GPIO output to the needed 5v - this breakout board has a perfectly sized breadboard under the PI Pico W where I was able to add the chip and wire it in. Now it drives the WS2812 strip like a champ and it all fits perfectly. This is a very helpful board and makes making small changes like that really trivial to do.
A**R
I'm not great at soldering, so these make a great substitute where I'm not worrying about breadboarding wires pulling off the pins. It makes the footprint of the pico bigger if you're tight for space in a project box, but then I just use a bigger box.
G**L
Permets une utilisation rapide du Adafruit Pico.
A**R
more assembly than expected . Once set up works well.
M**N
I bought this to go with my Raspberry Pi Pico ... WH ... pre soldered headers ... when I opened the package I understood that it was en error ... I do not solder ... and the thing needs to be soldered ... my error ... grrrr
A**W
Buyer beware, it's just a bag of parts.
Trustpilot
3 weeks ago
3 weeks ago